Automating power measurements using C#
Automating power measurements using C#
Introduction
Using the free software that comes with Otii is a great way to understand your device’s energy consumption and an easy way to get direct feedback on how changes in the hardware and/or software will affect power efficiency.
But as every developer knows, the real power of a developer tool lies in automating repetitive tasks. With the Otii Automation Toolbox, you can automate power measurements by integrating it with the tools you already use in your development stack.
Otii Automation Toolbox includes a TCP server with a JSON-based API that allows controlling the Otii application from any software supporting TCP connections. To make it even easier, we have created TCP clients you can add to your code for a few popular languages – Python, C#, Java & Matlab. You can find them on the Qoitech GitHub page.
In this article, we will show you how to get started automating power measurements using C# and a few valuable ways to automatically compute energy consumption for a specific part of your device’s energy measurement.
Setting up Otii for power automation
To automate Otii, you’ll need an Otii Automation Toolbox license. You can get it on the Qoitech website.
When you have your license, follow the steps in our documentation to set up and start the TCP server.
C# setup
To connect your C# program to the Otii software, you need the Otii TCP Client. It is available as source code from our GitHub page. It is also available as a NuGet package from nuget.org.
To get started, create a new C# project in Microsoft Visual Studio, and use the NuGet manager to install the OtiiTcpClient. You can read more about getting started with C# in the Otii documentation.
In the main program file, add the following code to connect to the TCP server:
using Otii;

namespace Test {
    class Program {
        static void Main(string [] args) {
            var client = new OtiiClient();
            client.Connect();
            var otii = client.Otii;
        }
    }
}
The default parameters of the Connect method of OtiiClient connect to an Otii software running on the same computer. If you want to run the Otii software on another computer, add the IP-address of which as an argument to Connect:
            ...
            client.Connect("192.168.1.5");
            ...
Connecting your device
In this example, we will measure the energy consumption of a Particle Argon connected to a DHT-11 temperature sensor.
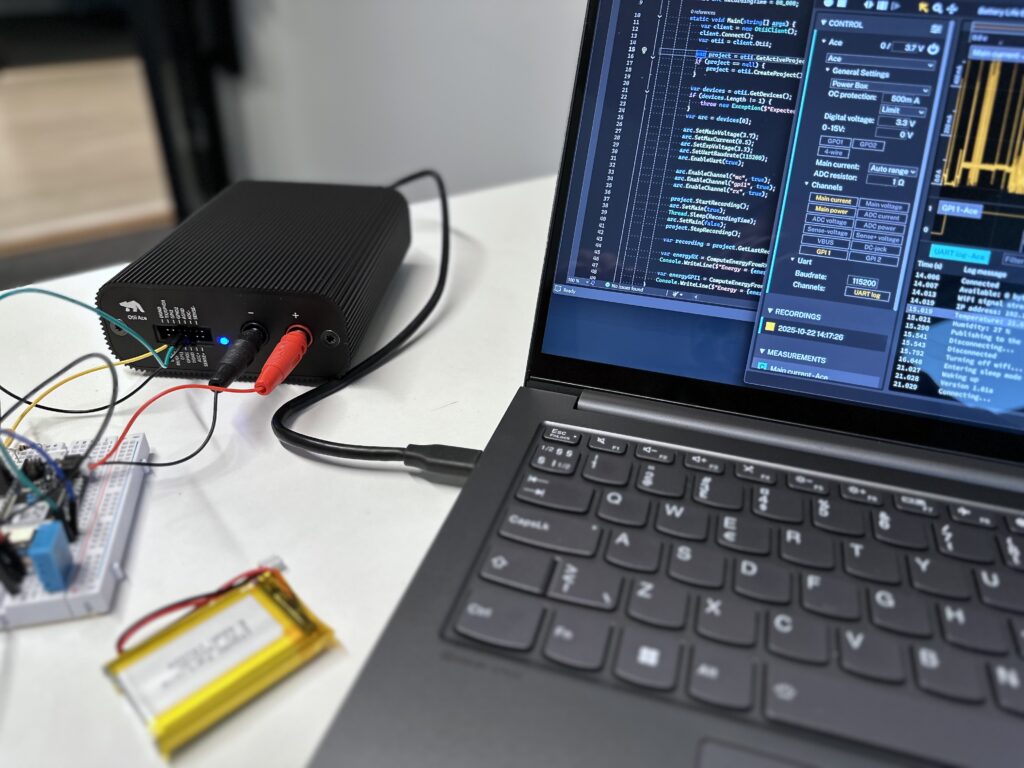
Fig 1: Otii Arc connected to the device under test
In this setup, we have:
- replaced the battery with a connector to the Otii Arc main output,
- connected the TX of the device to the RX of the Otii Arc to capture logs
- connected an additional digital output of the device to the GPI1 input of the Arc.

Overview of automation test set-up
In this setup, we will power the device from the Otii Arc while simultaneously measuring the total energy consumed over time. If you are programming your device using USB, remember to disconnect the USB cable when doing measurements. By the way, if you find yourself connecting and disconnecting the USB cable all the time, there is a way to automate that, too. Read about it here.
To compare two recordings made with different firmware, hardware, and/or setups, we need a way to mark the start and end of the period we want to examine. Typically, this would be one duty cycle, including a period of activity, followed by a (much longer) period of sleep mode.
We will show you two ways to do this: either via the device’s digital output or via messages sent over the device’s UART.
Setting up the project
To record data, we need an open project. Here we will use a common pattern:
- if there already is an open project, use that,
- and if that fails, create a new project
        ...
            var project = otii.GetActiveProject();
            if (project == null) {
                project = otii.CreateProject();
            }
Configure the Otii Arc
In this test, we want exactly one Arc to be connected to the computer. If we have more Arcs connected, we need to name them uniquely so we can address them separately.
The device in this test is usually powered by a rechargeable Li-Po battery, so we set the device’s power to 3.7 V. It is always recommended to set the over-current protection to a value 10-20% above the device’s max current.
The expansion port is connected to the device’s digital pins and UART, which are set to 3.3 V.
We also enabled the UART and set its baud rate to 115200 to match the Argon’s firmware setting.
            var devices = otii.GetDevices();
            if (devices.Length != 1) {
                throw new Exception($"Expected exactly one Arc to be connected, found {devices.Length}");
            }
            var arc = devices[0];

            arc.SetMainVoltage(3.7);
            arc.SetMaxCurrent(0.5);
            arc.SetExpVoltage(3.3);
            arc.SetUartBaudrate(115200);
            arc.EnableUart(true);
And last, we want to enable the channels we want to record. Here we want to measure the main current, the GPI1, and the UART RX:
            arc.EnableChannel("mc", true);
            arc.EnableChannel("gpi1", true);
            arc.EnableChannel("rx", true);
Recording data
For this device, we want to measure for at least 80 seconds to capture at least one complete duty cycle, including one period of activity and one period of sleep mode.
        const int RecordingTime = 80_000;
        ...
            project.StartRecording();
            arc.SetMain(true);
            Thread.Sleep(RecordingTime);
            arc.SetMain(false);
            project.StopRecording();

            var recording = project.GetLastRecording();
And if we now run the program, this is the output of the recording in Otii:
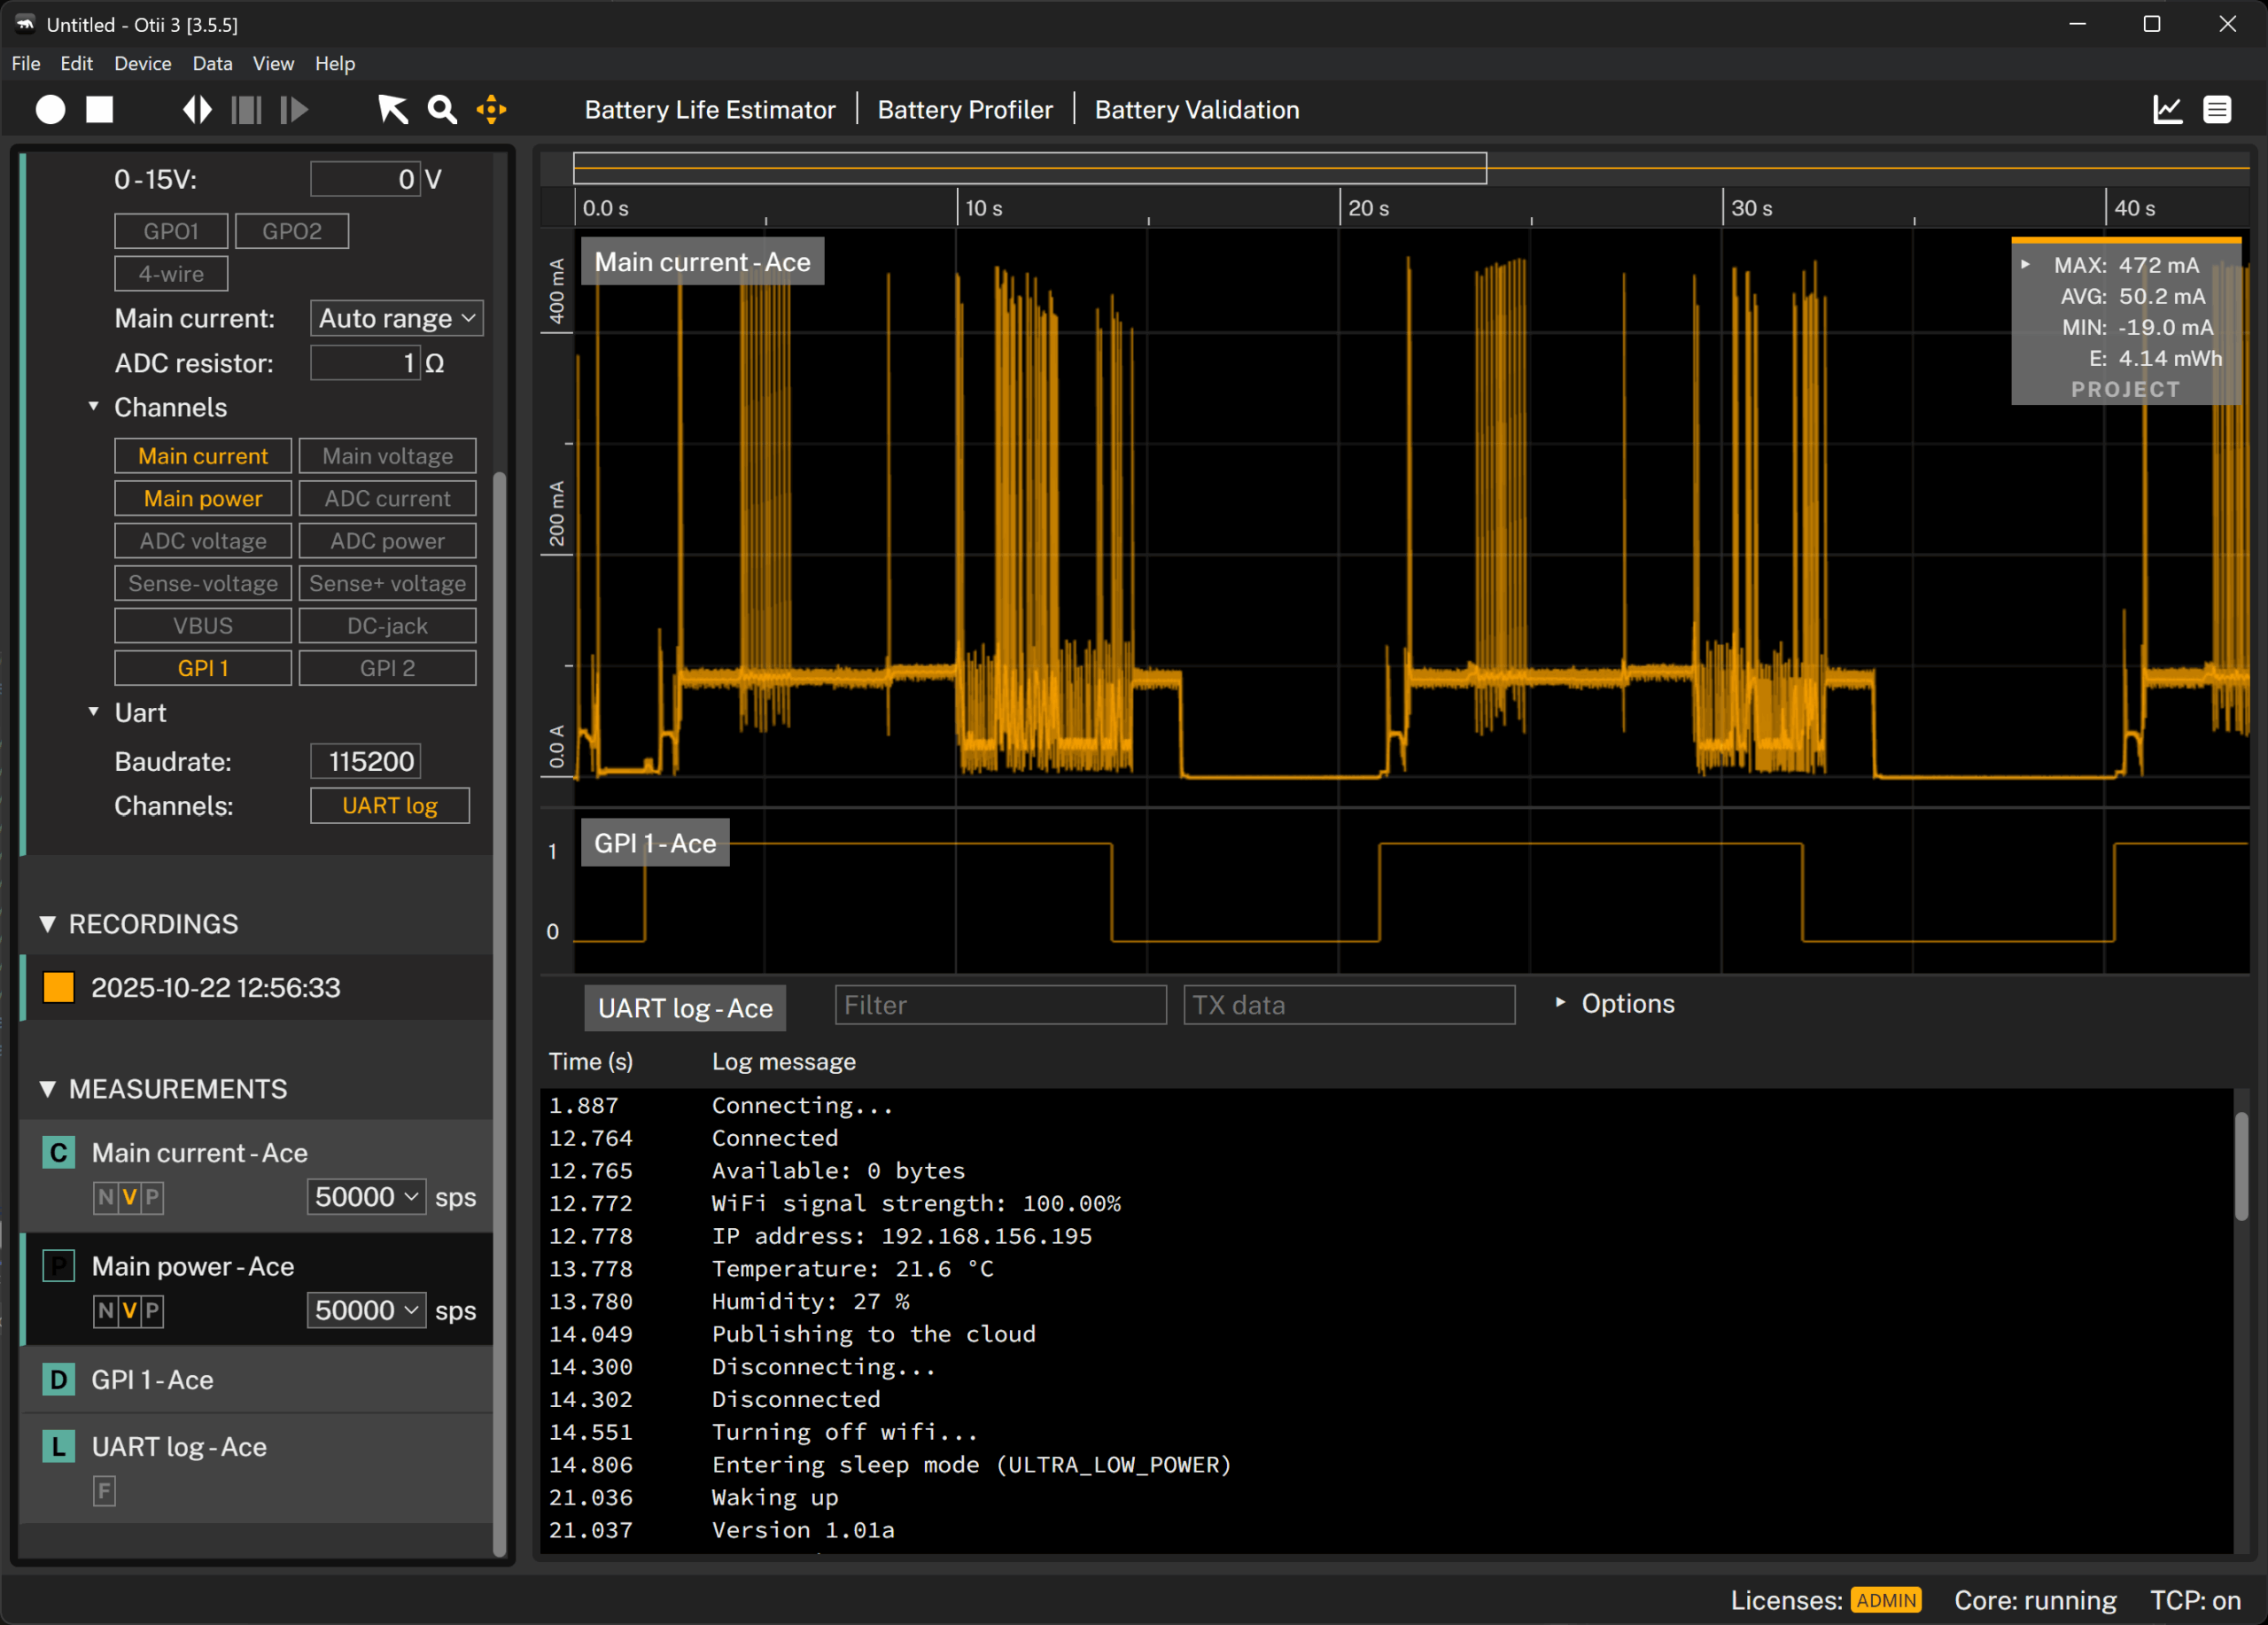
Fig 3: Otii real-time current recording
Analyze energy consumption
When you enable the main current channel, the main power channel is enabled by default as a hidden measurement. This channel is required to calculate the device’s energy consumption.
To find the start and end of a duty cycle, we will present two alternative approaches: either using the RX input or a digital input.
Analyze using the RX input
The firmware in this example outputs the text “Waking up” as the first thing when waking up from sleep. This is before getting a value from the temperature sensor and sending the result to a server using Wi-Fi.
So all we need to do is find two consecutive log entries containing the text “Waking up” and use the timestamps of those entries to get the accumulated energy for each one. In the device example, the first activity period is always a bit longer than the subsequent ones. Thus, we will use the second period to calculate the energy using the second and third log entries containing “Waking up”.
We can then compare this result with a threshold or with the energy computed from an earlier recording.
            var count = recording.GetChannelDataCount(arc.DeviceId, "rx");
            var rxData = recording.GetLogChannelData(arc.DeviceId, "rx", 0, count);
            var timestamps = rxData.Where(log => log.Value == "Waking up").Select(log => log.Timestamp).ToArray();
            if (timestamps.Length < 3) {
                throw new Exception("Need at last three \"Waking up\" log entries to be able to calulate the energy consumption for a period");
            }
            var timeFrom = timestamps[1];
            var timeTo = timestamps[2];

            var statistics = recording.GetChannelStatistics(arc.DeviceId, "mc", timeFrom, timeTo);
            var energy = statistics.Energy;
Analyze using the digital input
If you don’t have a UART log to sync with, or you don’t want to use it because the UART draws too much energy, you can use your device’s digital output instead.
The device in this example will set the digital output to high when waking up, and to low before going to sleep. Because the first period is longer, we will calculate the energy between the second and third times the digital output goes high.
            var count = recording.GetChannelDataCount(arc.DeviceId, "i1");
            var data = recording.GetDigitalChannelData(arc.DeviceId, "i1", 0, count);
            var timestamps = data.Where(log => log.Value).Select(log => log.Timestamp).ToArray();
            if (timestamps.Length < 3) {
                throw new Exception("Need at last three positive flank timestamps to be able to calulate the energy consumption for a period");
            }
            var timeFrom = timestamps[0];
            var timeTo = timestamps[1];

            var statistics = recording.GetChannelStatistics(arc.DeviceId, "mc", timeFrom, timeTo);
            var energy = statistics.Energy;
Links to code
- C# example code for one duty measurement cycle
- Otii TCP client for Python
- Otii TCP client for Java
- Otii TCP client for Matlab
Conclusion
Automating repetitive tasks is the real strength of developer tools and can make our lives a lot easier. Using the Otii Automation Toolbox you can automate using C#, and automatically compute the energy consumption for specific parts of the measurement.